Posts

Showing posts from July, 2020

Christmas Tags

Image
Scrap of Your Life Christmas in July Event - Project Four This project is quick and easy making Christmas Tags, however be warned, be prepared to have glitter everywhere :-)  Here is a photo of the goodies I used for this project. You can purchase all different size tags, so it is up to you what size you want your tags to be, for my project I used 4 1/2 inch tags cut out using my Cricut (Tags, bags and more cartridge) - I LOVE this cartridge and use it quite a lot. The size was ideal for the stamp I wanted to use. Once I cut out my tags, I placed them on my stamparatus and stamped the Christmas Tree Stamp from Studio Light. I used two different Archival Ink colours for the two tags, Fern Green on one and Olive on the other. Once I stamped my image, I then stamped the back of the tag using the same Archival Ink and stamped "To and From"using the Ranger Letter Christmas Stamp set. I then added some special delivery washi, only using the Dec 25 portion of it, cutting off the spe...
Snowflake and Reindeer Bauble Lantern

Image
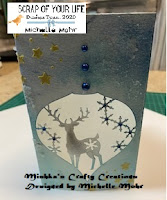
Scrap of Your Life Christmas in July Event - Project Three This project is a light up Snowflake and Reindeer Bauble Lantern that you can use on your table or around the house.  Here is a photo of the goodies I used for this project.The jar you can't see the writing on (sorry) is Texture Paste, and I also used Tim Holtz Snowflake Dies. This project was really quick and fun, playing with distress ink, and the snowflake paste again. I firstly cut a piece of A4 white card stock, trimming the edge off to make it big enough to fit into my bigshot. Then I scored the card stock at 1cm, and 19.5cm and flipped it over and scored again at 19.5cm. Fold the score lines.  Taking a blending brush, I started with the darkest blue (Tim Holtz distress ink chipped sapphire) at top and brushed coming in from the side and going across the top of the cardstock and down. Taking the next medium blue (Tim Holtz distress ink peacock feathers) , continued blending and lastly the light blue (Tim Holtz di...

Mini Christmas Wreath

Image
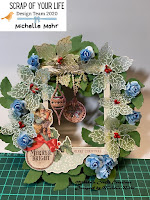
Scrap of Your Life Christmas in July Evnt - Project Two This project is to make a Mini Christmas Wreath using a Styrofoam circle and wrapping it with burlap, and then decorating. I will pre-warn you, the preparation of this project is a little long, as there is a combination of stamping, embossing, colouring and die cutting, so ensure you make some YOU time to sit and create.  There are many different bases you could choose from if you didn't want to use Styrofoam such as wire, ready made moss or wood wreaths, francheville collection wreaths etc, it's really up to you what you want to use, and what design you are looking for at the end. Here is a photo of the goodies I used for this project. (Distress Inks were also used) To start the project, I rolled out the burlap long enough to cover the circle and cut the burlap down in half. I used a burlap that had a little glitter in it, although the end result doesn't show this, only the back, you could just buy plain, and you ca...

Christmas Pudding Table Setting

Image
Scrap of Your Life Christmas in July Event - Project One Who doesn't love a Christmas Pudding?  This pudding unfortunately you can't eat......... For my first project for the Christmas in July Event, I'd like to share with you a Christmas Pudding Table setting that can be used as a name placement setting or simply a decoration on your table or around the house. This project was inspired from many years ago! Back in the day when Crafty Kids was around, which some of you long time crafters like me may recall. I attended a class and we made the one shown and since then I have created my own take on it.  We have used the ones I created every year since, and some were reincarnated after wear and tear of packing away, and are kept at my parents place for their Christmas Table. The name tag was made out of a Star for those ones. I made these ones a little different this time round. Here is a photo of the goodies I used, remember though, if you don't have everything, improvise ...

Sneak Peak for Christmas In July

Image
Scrap of Your Life ONLINE Christmas Event  kicks off on Friday, July 24 at 7.00pm and goes for ONE WHOLE WEEK!!! How exciting is this! Come and join us online, Julie, the Design Team and I will be showing you some amazing Christmas Crafts, tutorials and techniques we have been busy creating for you to make. Bring your smiles, Christmas cheer, a snack or two, and crafty goods and come craft with us!  Here is a sneak peak of three of the four projects I have completed! Time got away with me this weekend, so my fourth project will be coming next weekend :-)       Can you guess what is in store? ...................... Some great ideas :-)  Hope to see you there! Happy Crafting Michelle xx

Inspirational Vision Board

Image
For the last couple of weeks I have been working on a Inspiration Vision Board, and I am really happy where it is at right now and what I have done with it so far. I only get to play on the weekends, so my creations sometimes take a little longer than planned. So what is a Inspiration Vision Board?  There are all different types of "boards" people create, and these can be interpreted in so many different ways by an individual. The most common types are a "mood board"or "vision board", when someone is wanting to create a presentation to be inspired to achieve a goal. Wikepedia states: a " Mood Board"  is a type of visual presentation or a collage consisting of images, text, and samples of objects in a composition. It can be based upon a set topic or can be any material chosen at random. A mood board can b e used to convey a general idea or feeling about a particular topic. They may be physical or digital, and can be effective presentation tools an...

Welcome to Mishka's Crafty Creations

Hello, welcome to Mishka's Crafty Creations Blog, where I hope to be able to inspire you with my creations so you can come along with me on my journey! I am super excited to be part of  Scrap Of Your Life  Design Team, a very first for me, so I am a little nervous, however I am looking forward to the next 6 months and the exciting projects and inspiration I can bring to you. A little about me.....I have been crafting since I was around 18 years old (a long time ago) or thereabouts, and not always with paper crafts. I actually started cross-stitching, which then lead me into making teddy bears with embroidery on them. From here I moved into paper crafts, being introduced to Crafty Kids at the time and absolutely loved what they offered. I then met some wonderful, creative people along the way attending various craft workshops and enjoyed being with like minded people and creating to our hearts content. I have developed some wonderful friendships along the way, and created many ...