Christmas Tags
Scrap of Your Life Christmas in July Event - Project Four
This project is quick and easy making Christmas Tags, however be warned, be prepared to have glitter everywhere :-)

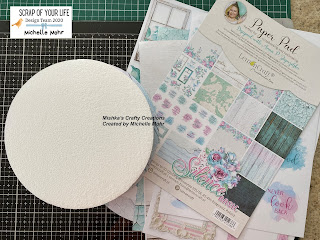
Here is a photo of the goodies I used for this project.

You can purchase all different size tags, so it is up to you what size you want your tags to be, for my project I used 4 1/2 inch tags cut out using my Cricut (Tags, bags and more cartridge) - I LOVE this cartridge and use it quite a lot. The size was ideal for the stamp I wanted to use.
Once I cut out my tags, I placed them on my stamparatus and stamped the Christmas Tree Stamp from Studio Light. I used two different Archival Ink colours for the two tags, Fern Green on one and Olive on the other.


Once I stamped my image, I then stamped the back of the tag using the same Archival Ink and stamped "To and From"using the Ranger Letter Christmas Stamp set.

I then added some special delivery washi, only using the Dec 25 portion of it, cutting off the special delivery and saving that for another project. I then applied Liquid Drops 3D Pearls in Icing Fisher and Brass on the tree to create a bauble effect.
Then I applied Prima Christmas in Country Say it with Crystals in red, green and gold, and A Christmas word sticker from my sticker collection. Love these crystals!
Once completed, I added the gold trim ribbon to the top of the tag and the Champagne Glass Glitter (Stampin Up) on the edge of the entire tag using a two-way glue pen.
And here are the finished Tags - I really love how quick and easy they were, and how cute they ended up being.


Happy Crafting
Michelle xx


Comments
Post a Comment