Scrap of Your Life Christmas in July Event - Project One
Who doesn't love a Christmas Pudding? This pudding unfortunately you can't eat.........
For my first project for the Christmas in July Event, I'd like to share with you a Christmas Pudding Table setting that can be used as a name placement setting or simply a decoration on your table or around the house.
This project was inspired from many years ago! Back in the day when Crafty Kids was around, which some of you long time crafters like me may recall. I attended a class and we made the one shown and since then I have created my own take on it.
We have used the ones I created every year since, and some were reincarnated after wear and tear of packing away, and are kept at my parents place for their Christmas Table. The name tag was made out of a Star for those ones.
I made these ones a little different this time round.
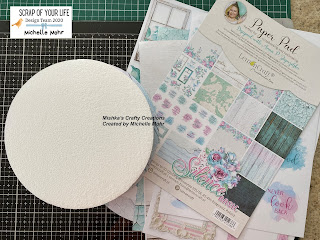
Here is a photo of the goodies I used, remember though, if you don't have everything, improvise with your own stash of craft goodies!
I first painted the styrofoam ball (I picked up a pack of 6 from Spotlight) with melted chocolate dylusions paint. If you love getting your hands dirty, this is a great project, as I always end up with paint all over my fingers from holding the ball! Leave it to dry or dry with a heat gun, being very careful not to burn the styrofoam, personally I prepare the rest of the pudding bits and pieces whilst it drys, and sometimes leave it overnight.
The next steps is having fun using a big shot.
Firstly I cut out the circle star dies for the base of the pudding holder using red Christmas paper from the Dress my Craft Christmas Bells collection pack. This pack of papers is so awesome and shiny! Then I used the natures root die from Stampin Up to cut out the leaves. This die set is really great, as it is a two step die, emboss the leaf first then cut it out to get the leaves looking like real. Next was the reindeer from the Tim Holtz Winter Wonderland die pack.
The deer is then embossed just around the edges. I used a versamark pen to do this. Use the pen in the places you would like the embossed powder to end up at, then tip the required amount on the edges, remove excess powder and heat gun until dry. It starts to bubble once its heated. I used the Stampendous Shabby embossing powder in Ivory.
Looking good so far!
Now to put it all together! The most fun part of all!
Add snowflake paste to the styrofoam ball and spread it around. I find using my fingers is the best rather than a spatula. Add a little bit of the paste to the circle die as well. Once this has dried, you can use a heat gun here, however as before, be careful not to burn the paste and the ball. Add the leaves. I made a slight cut in the ball and inserted them next to each other. Then add the beads. I used beads this time as I thought it made it look a little brighter.
Place some glue at the bottom of the ball and stick to the base. Allow to dry.
Finally...... add the reindeer! My reindeer is literally just sitting there with a tiny bit of glue at the back and I leaned it onto the ball. Add a name if using as a place setting or simply add it to your Christmas decorations on the table or around the home!
I hope you enjoy making this project!
Don't forget to take part in the week long Christmas Event with Scrap of Your Life and the Design Team! We have lots to share!
Happy Crafting
Michelle xx


Great project Michelle...off to buy me some styro balls I think.. :)
ReplyDelete